Happy New Year and welcome to 2012 at Hand Made-n's! With all the holidays over thoughts are turning back to school! Why not make this fun project for your or your children's books this year! This simple to make fabric notebook cover is great for school books, journals, sketch pads or even much loved novels. It is so simple that even a beginner could make it without difficulty.

1. Iron Your Fabric.
| |
2. Measure your book, measure the width of the front and back covers and the spine. Add approx 2.5cm to this measurement to allow for seams.
|  |
3. Lay your book on your fabric. Allow approx 8cm above and below the book. Using the measurement you took above, measure out the length needed from one edge of the fabric. Cut this rectangle of fabric out. You should have another rectangle, approx 16cm in length remaining.
|  |
4. Take the 16cm remaining rectangle and cut this in half. You now have a large rectangle for the cover of your book and two smaller rectangles that form the sleeves. Set the fabric aside.
|  |
5. If your exercise book has a bold cover that will be visible through the fabric, take a glue stick and white paper and roughly cover the bold image. A small note book will take two A4 sheets, overlapping. Note: Don’t do this to novels if you intend to take the fabric cover off! Set this aside to dry.
|  |
6. Take one of your smaller rectangles. Fold in one long edge ¾ of a cm and pin. Run a straight stitch down this fold.
|  |
7. Fold this same edge in again, another ¾ of a cm so that no raw edges are visible. Pin and straight stitch the length of the fold again.
|  |
8. Take your other small rectangle and repeat steps 6 & 7, making sure that if your fabric has a distinct orientation you sew the opposite edge to your original rectangle, as pictured. Not doing this will result in the images of one of your sleeves being upside down!
|  |
9. Take your large rectangle, the book’s outer cover, and lay it right side up. Right sides together, pin your sleeves to the edge of the cover, making sure the folded (hemmed) edges face inwards and that the pattern on the sleeves is running in the same direction as the pattern on the outer cover.
|  |
10. Sew around the top edge, outer edge and bottom edge of the sleeves only, leaving a seam allowance. Make sure you leave the hemmed edge open.
|  |
11. Turn the sleeves out. You should now have a basic slip.
|  |
12. You will notice that at the top and bottom of the sleeve, where it meets the large rectangle, the raw edges of the rectangle are already folding in.
|  |
13. Pin this fold along the length of the top and bottom of the large rectangle. Sew along these lengths with a straight stitch.
|  |
14. Take your exercise book and centre it on your cover.
|  |
15. Using your chalk or vanishing pen mark where the top and bottom of the book sit. This needs to become the top edge of your cover. Fold your fabric along this line, putting a crease in it if possible. Place one pin in the middle to hold the fold in place.
|  |
16. Move along to one of the corners.
|  |
17. Open out the corner, with your thumb on the outside and pointer finger on the inside.
| 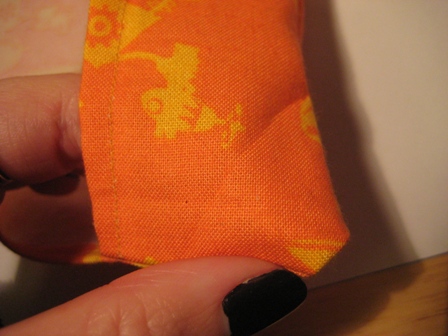 |
18. Push the corner inside itself, pushing the corner up and so that it points toward the long sides of the cover.
|  |
19. This is how it should look inside. The short edge of the cover, the part of the sleeve the book goes into should be able to be lifted, unobstructed.
|  |
20. When the sleeve is down the fold should look square as pictured. Pin along the top of this fold. Repeat with remaining corners.
|  |
21. When all corners are pinned insert your exercise book and make sure it fits snugly, adjust the folds as needed until the exercise book fits comfortably. Remove the book.
|  |
22. Stitch along the long edges of the book cover, including the folded sleeves. Don’t worry if a little bit of the fold pokes out like this, it will be covered by your exercise book.
|  |
23. Give your cover another iron before inserting the book cover into the sleeves.
|  |
24. Your cover is now complete! You can embellish your cover with embroidery, ribbons on press studs of you can leave it as it is. The cover is easily removable so you can wash it if it gets grubby. Happy writing!
|  |
No comments:
Post a Comment