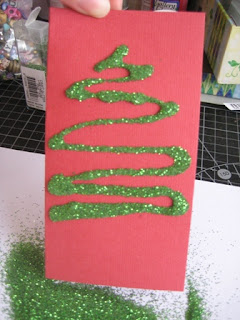
Need a Christmas card in a hurry? Or do you want to make your own greeting cards this year and are unsure where to start? These simple Christmas cards can be whipped up in 10 minutes, even by beginner paper crafters! The best thing is you will probably have most of these supplies in your craft stash already. ~ Caitlan
Ruffled Tree Card:
You will need:
· A piece of cardstock folded in half to be your card, any size you want
· A rectangle of cardstock, smaller than half of your card
· Green Cardstock
· Brown Cardstock
· Gems, pre-stick or non-adhesive round and a star, optional
· Green or metallic stamping ink
· Glue
· Scissors or a paper knife
· A bowl of water
1. Begin by cutting out a triangle from your green cardstock, a little bigger than you want your finished tree to be.
2. Cut your triangle into horizontal strips.
3. Cut vertical strips into the longer edge of each trapezium, you can use scissors or your paper knife, be careful you don’t cut the piece in half!

Each piece should eventually look like this:
4. Dip the cut strips into a bowl of water for a few seconds; this makes the paper a little more malleable.
5. Gently curl the tasselled edge around your finger until it stays in place.
6. Brush ink onto the tasselled edges, this hides the white that will be shown from cutting the paper. You can use green for a subtle look or a metallic colour to add some sparkle to your tree! Set these aside to dry.
7. Grab your smaller rectangle of cardstock and glue it to the centre front of your folded card stock.
8. Glue the top of your tree to your card first at the height you would like it to sit, don’t forget to leave space for a star!
9. For the subsequent trapeziums place them beneath the tassel above, make sure that the edges do not dramatically over hang the above piece like this:
If they do simply trim them at an angle to give your tree a gentle slope, glue each one in place.
10. When you have added all the layers of your tree, cut out a small brown rectangle to act as the trunk. Glue it in place, hiding the top beneath the tassel of the lowest green layer.
11. Decorate with gems and a star if you wish and you are all finished! You can always write or stamp a greeting beneath your tree if you would like.
Glitter Tree Card:
You will need:
· Card stock folded in half to form your card’s base
· Glue, either PVA with a squeeze lid or a very fine glue stick
· Glitter in green and another colour
· Glitter glue if you hate the mess of glitter
· A piece of scrap paper to help with clean up
1. Place your folded cardstock on top of a scrap of paper that covers your workspace.
2. Using your PVA glue, draw a zigzag in the shape of a tree without a base. If you are using glitter glue you can draw your zigzag with that.
3. Generously pour green glitter all over your card, making sure that all the glue is covered.
4. Shake off the excess glitter onto your scrap paper, you can now fold this into a funnel and pour the excess glue back into its container.
5. With your PVA add a base to your tree, either a trunk or a decorative pot, or if you are using glitter glue simply draw it on with your glue.
6. Pour glitter that coordinates with your cardstock generously onto your base. Shake off excess onto your scrap paper, being careful that you don’t pour it over the tree part of your card as the colours will mix.
7. Funnel excess glitter into storage container and your card is complete!
Ribbon and Stamps Card:
You will need:
· Cardstock, folded in half to for your card base
· Ribbon in a colour that coordinates with your card stock
· Rubber or acrylic Christmas stamps of your choice
· Double sided tape or glue
· Stamp pad
· Embossing powder in a colour that coordinates with your card stock
· Heat gun or hair drier
· Scrap paper
1. Mark out where you would like to place your ribbon, double sided tape is great as it keeps the ribbon looking straight, but you can always use glue if you don’t own tape.
2. Carefully place your ribbon along the length of the card, ensuring it is straight.
3. Stamp on a design.
4. Pour on embossing powder, shake off excess onto scrap paper and funnel back into its container.
5. Gently heat embossing powder with Heat gun or hair drier set to hot, be careful that you don’t over heat your hair dryer by using it for too long! Have a break between each design.
6. Stamp on a greeting and repeat the embossing process.


No comments:
Post a Comment